Tuesday, July 30, 2013

Handy Tools

Having the right tools for the right job helps things go a lot smoother.  I'm sure there are a lot of tools and tricks that help make float building a lot easier that I don't know about.  But I will tell you about the ones we used that helped.
Hog Ring.  This tool helps you attach things together.  It was especially helpful in attaching fabric and festooning to pencil rod.

This tool is a little pricey so try to find someone in your stake that already has one that you can borrow.


Curry Comb

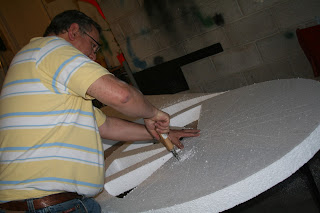
A curry comb helps you shave and shape styrofoam sculptures.  Again try to borrow one.


A rasp helps with more detailed shaping of your foam sculptures.  These are fairly inexpensive tools.
 that you can find at home improvement stores.


A styrofoam cutter is a heated tool that melts styrofoam.  It is about $20 at the craft stores.  Don't forget to take a coupon with you!  This tool works best on 1" foam or smaller.  Works great on lettering!  You can also use a bandsaw or reciprocating saw but they are harder to use.


A sawzall, bread knife, reciprocation saw and hot knife work for thicker sheets of styrofoam


Get a sanding block from home improvement stores to sand figures smooth.

If you go to the float classes they will explain all of this to you in greater detail!


Saturday, July 27, 2013

Float Design

What will your float look like?  Gather your committee and brainstorm ideas of what you want your float to look like.  Try to be unique but not bizarre.  Your design concept should adhere to the theme for the Days of '47 parade.  Start with a rough idea of what you want on your float and build from there.  Make sure you plan  every detail before you start building.

Will you use a wire shape such as an airplane or globe? Or a building like a temple or house?  How will you attach these to your float?  These kinds of decisions need to be made at the beginning.
You need to mount signs posts or stansions (upright bar or post for support).  Attach these early so you don't set your float on fire from welders sparks. You will need to know where everything will be placed so you can add supports where needed.  It is hard to add stansions after the fact, and it is hard to mount foam figures to your float without supports. Although, if you get creative it can be done but won't be as sturdy.

Will your float bed be flat?  Or will it be raised or bumpy in spots.  Build this into your design.


Will you have any animation on your float?  That needs to be designed early in the process. On the float in the picture above the turtles' legs and head moved.  It was really cute.


Plan colors that will compliment or contrast.  Almost anything goes.  Bright contrasting colors are fun and vibrant, warmer colors are peaceful and soothing.  What feeling do you want your float to display?  Make sure your lettering will stand out.

You will need to display the parade theme in some form on both sides of your float. You will also need to display your  Stake or Organization name.  That is usually on the front or back of the float.
For the Youth parade children may not ride on floats but adults can.

Getting Started

The first two things you need are a place to build your float and a trailer to build your float on.  Choose a place that will be big enough to fit your float out the door after it is built.  For the smaller floats, it should have a door at least 10 feet wide and 14 feet high.  You will need a place with electricity, it would also be nice if this place had running water. Your hands will get dirty, sticky, and glittery; having a place to wash up would come in handy.  If nothing else bring a bucket of water with you for cleaning purposes.  If you are in the big parade you obviously will need a bigger space to build your float.
Next, get a trailer.  The trailer should be approximately 8-10 feet in width and 10-12 feet in length.  A trailer normally used to haul snowmobiles or 4-wheelers is the standard size to use as a float base.  The tricky part is getting someone willing to donate their trailer for the summer when they would rather be using it to pull their recreational toys.  If you are in the big 24th of July parade trailers will be provided for you.

Budget and Materials

We were given a $700 budget for our Youth float.  That is the standard budget each float gets from the Church.  The first thing they will tell you at your consultation is that you can't do hardly anything with just $700.  The budget for the big 24th of July Parade is bigger, but they also have to build a bigger float.  So like most things in life money will be tight.  Here I will attempt to give you a rough idea of how much things will cost.

Floral Sheeting will cost approximately $70 a roll (36" x 10 yds).  We used 3 rolls.  Floral sheeting is the plastic carpet type stuff you see all the floatbeds covered with.  In the picture below the floral sheeting is the red, yellow and blue.
Festooning will cost between $25-$60 for 48' depending on the type you use.  We used 2 rolls of metallic. Festooning is like tinsel or garland. In the picture below the festooning is the silver lining.


Fringe will cost you $7-$9 for 10 ft. depending whether you use vinyl or metallic fringe.  Fringe is used around the bottom of the float to cover the dead space between your float and the road.
Glitter costs $8 lb for most colors and $12 lb for the iridescent.  We bought 2 lbs of each, but i think we could have gotten by with 1 each.  Glitter goes farther than you think it will.  You use glitter for lettering and anything you want to make sparkly.


Foam is used to make soft object, like the flowers in the above picture.  This type of foam will cost about $8.50 per foot (90").
You will probably also use solid foam.  1"Foam boards for lettering will cost $18 a sheet.  3" x 8' x 4' foam sheets run $50 a sheet and 6" boards (8'x4') cost $96 a sheet.  These hard foams are used for objects and figures. For example:  in the picture below we used 1" foam to cover our wagon, 3" foam to make our wheels, and the wider foam to make our bird.


You will also need to buy adhesives.  Fast tack, which is a foam and fabric adhesive runs $21 a can.  We used 2 cans.  Silicone costs just over $6 a tube, which we used 3 of.  A can of 'Great Stuff' will cost you $8.50 a can, we used 3 of these as well.
You will need plywood for the bed of your float.  You may also decide to build other structures from plywood.  Plywood costs just over $22 a board.
We made our blimp frame out of pencil rod.  You can have your welder make any shape you would like; dinosaurs, airplanes, bears, etc.  1/8" pencil rod costs about .45 a foot.
Other costs will include:  nuts, bolts, fabric, ect, the list could be endless.  And you will need to decide if you are going to spend any money for costumes or shirts for the kids to wear.  We bought material to make bandanas for each participant.  Also, will they be carrying anything?

As you can see the costs add up fast.  We did not stay on budget, but only went over about $150.  Any material donations you can get will be extremely helpful.

You can get cans of paint at the Landfill for free.  They may or may not have the colors you are looking for.  If they don't have what you are looking for one week maybe they will the next.  We were able to get most of our paint at the landfill.  We mixed colors together to get the color we wanted.


Monday, July 22, 2013

Float Classes

Innovative Design Concepts (IDC) and Modern Display both offer personalized float consultations.  Just give them a call and make an appointment and they will help you brainstorm possibilities for you float.  They will help you know what materials you need and how much to order.  I did a price comparison on float supplies and both these two companies are relatively similar in materials and pricing.

IDC and Modern Display also offer free float classes.  I strongly recommend that you attend these classes. They are extremely helpful in learning float building concepts and techniques.  These people have many years experience, and if you are like me-you have none.  So save yourself some stress and headache and learn from the experts.  There will be a kick-off class in January and then a monthly class following that.  Give them a call to find out exact dates.  Modern Display 801-355-7427.  IDC   801-936-1306.

Time Line

Keep in mind this is for the Youth parade.  If you are participating in the big, July 24th parade your timeline will be a little different (everything will be moved up).

First, find a place to build your float!  Find someone with a big garage, shed or barn.  You will want it to be indoors so you don't have to worry about wind, rain, sun, etc.  It is very important that you get a place that has a door tall enough for your float to fit under.  I have heard stories of people building floats in garages and then not being able to fit out the door.  Don't be one of those people!  Float sizes are about 8-10 feet wide, 10-12 feet long, and a maximun height of 14 feet.

The new theme for the Youth parade usually comes out in December.  Try to have your committee members called by then.  When the new year's theme comes available you can then meet with your committee and brainstorm ideas on how you want your float to turn out.

"Pioneers...Our Anchor for the Future"

There will be a Stake Float Kick-off meeting for all Float Chairpersons around the 1st half of January.  We did not find this out until it was too late and we missed the meeting.  So make sure your Stake representative relays information to you in a timely manner.  If you do miss the meeting like we did then you can contact the Days of '47 Representative and they will mail you an information packet.  You can get their information online at the Days of '47 web page.  http://www.daysof47.com/events/youth-parade/

Your float design, entry form, and media statement will need to be submitted to the Days of '47 committee about the first part of April for approval.  For the big parade I believe you can submit your design in January. Make sure you check your information for your specific dates. If you do not hear back from them in a timely manner then you need to contact them.  Somehow we got overlooked and did not hear from them, causing us to delay starting work on our float.

A note on getting approval:  If you want your float to have licensed characters on it such as, Bugs Bunny, Mickey Mouse, Lego, etc, you will need to get approval from that company, (ie: Warner Bro., Disney, etc).

Advice:  Keep a copy of your media statement as they asked us later to resubmit it.  We had not kept a copy therefore we had to make up a new one and that was a pain.

Start work on your float as soon as possible.  Like everything it takes more time than you think it will.  And everyone on your committee will think they need to have a summer vacation, so plan accordingly.

The Youth parade is typically on the Saturday before the 24th of July.  Check your parade date.  You will also be asked to display your float at the Float Preview Party at the Southtowne Expo Center, which is generally a couple of days before the July 24th parade.

Sunday, July 21, 2013

Building a Committee

It is very important you get dependable, dedicated people to work with.  I have heard horror stories of float committees that fall apart and leave all the work to the Committee chairperson.  Thankfully we were blessed with a good crew to work with.


Tell your Stake President that you will need welders, 


builders, artists, and overall handy people.  


You will want about 8 people on your committee that help with the ideas and planning.  Then add others that are capable of helping carry out your plans and ideas.